Once logged in to Customer Thermometer head to Thermometers > Add new Thermometer > Within a helpdesk ticket > Basic HTML
This will then open up your Thermometer Builder where you can create your survey and thank you pages.
The Question
This section of the builder is where you can choose the design of your survey including naming your Thermometer, adding your question and selecting your survey icons or uploading your own bespoke icons. The below video will demo all the customization which can be achieved in this section.
Connect your survey
In order for identifiable data about your recipients and senders to display within your reporting area, you first need to capture it. This would be done at the point that the email is sent, by including merge fields/variables from Netsuite within the Thermometer code.
The most common Netsuite variables are shown below for you, however, you can add more if you wish.
Suggested fields are included below for easy cutting and pasting:
${customer.firstName}
${customer.lastName}
${customer.email}
${customer.id}
${salesrep.email}
${salesrep.firstName}
${salesrep.lastName}
${user.email}
These variables will capture the corresponding pieces of identifiable data from Netsuite and present them alongside the recipient's feedback rating within your reporting.
Response options
In your Connect your survey area, you have additional response options. Here you can choose whether to enable a lockout and set your email alert notifications.

Separate multiple email addresses with commas.
Thank you page
It’s time to get those Thank you pages looking beautiful!
See below for a step by step walkthrough:
Embedding your survey into Netsuite
Once you've finished designing your Thermometer, the 'Give me my Thermometer' section will provide you with your finished survey to embed into Netsuite. Click the 'Copy to clipboard' button to copy your survey HTML to embed into Netsuite.
You have two places you can embed the code:
- Signature
- Template
Add Customer Thermometer feedback buttons to user profile signatures
Visit your user profile page and paste the HTML code generated above into the user signature box.
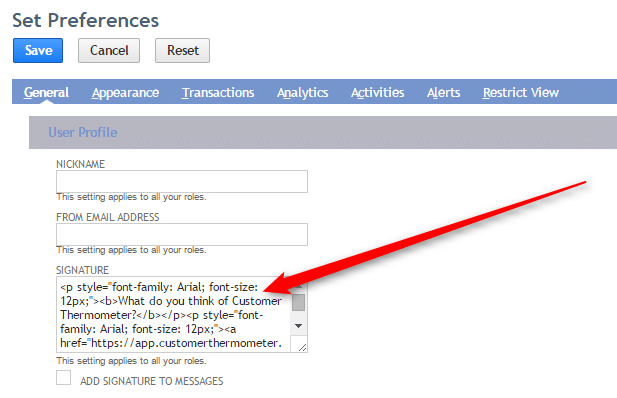
Feedback buttons will then appear at the bottom of all emails sent by that user.
Recipients will be tracked in your Customer Thermometer reporting.
To track the user’s details (in order to create league tables of your team or send email alerts based on responses / comments etc), ensure {user.email} is added to one of the custom fields when generating the embed code within Customer Thermometer.
Note there is no dollar sign for this tag when used in this format.
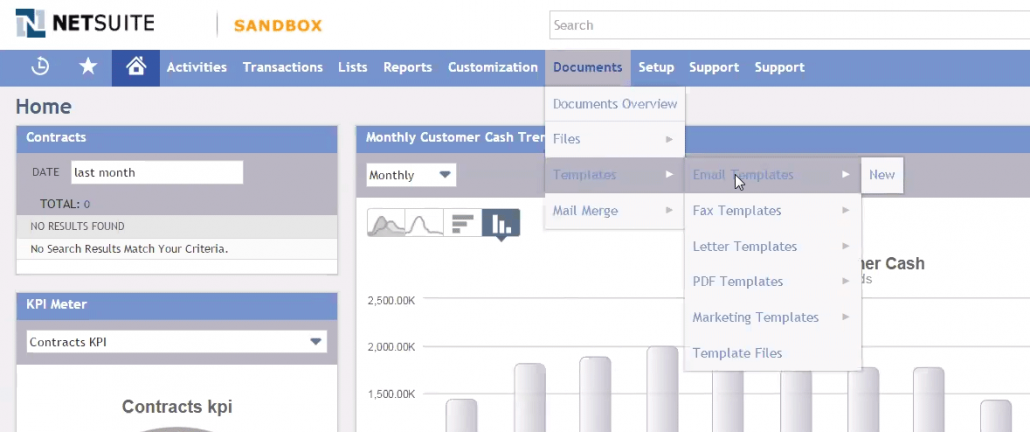
Add Customer Thermometer feedback buttons to NetSuite Email Templates
Whether agents use Email Templates selectively or are triggered via workflow, you can add feedback buttons into NetSuite Email Templates to rate performance.
Visit the Email Templates area:
Create a new Email Template, or edit an existing one.
It’s simplest to paste the HTML code you generated from above, into Email Templates, using the HTML editor. To do this, click the ‘source’ button as shown, to view the Email Template in HTML mode.

Paste in your generated embed code at the right point within your template. It could be as a footer or within the body of the email.

Once complete, save your template and it’ll be ready for use. Your NetSuite integration is complete.
