---
title: Setting up an Exclaimer Thermometer
description: Guide to creating and inserting Customer Thermometer surveys into Exclaimer signatures
---
[Skip to content](https://support.customerthermometer.com/knowledge/setting-up-an-exclaimer-thermometer#main-content)
English
Show submenu for translations
[Contact the Ministry of Magic](https://support.customerthermometer.com/knowledge/kb-tickets/new)
[](https://www.customerthermometer.com/)
- [App link](https://app.customerthermometer.com/)
- [Survey tips & advice](https://www.customerthermometer.com/resources/how-to-embed-customer-thermometer-into-your-business/)
- [System status](https://status.customerthermometer.com/)
Open main navigation
Close main navigation
- [App link](https://app.customerthermometer.com/)
- [Survey tips & advice](https://www.customerthermometer.com/resources/how-to-embed-customer-thermometer-into-your-business/)
- [System status](https://status.customerthermometer.com/)
- English
Show submenu for translations
- [Contact the Ministry of Magic](https://support.customerthermometer.com/knowledge/kb-tickets/new)
How can we help you?
- There are no suggestions because the search field is empty.
1. [Brilliant help, moments away.](https://support.customerthermometer.com/knowledge)
2. [Integrations](https://support.customerthermometer.com/knowledge/integrations)
3. [Exclaimer](https://support.customerthermometer.com/knowledge/integrations#exclaimer)
July 23, 2026
# Setting up an Exclaimer Thermometer
### **Create your Exclaimer Embedded Thermometer**
To create a new Embedded Thermometer head to ‘Thermometers’ in the top white bar. Then click the pink ‘Add new Thermometer’ button.
You’ll then be taken to your Thermometer builder to create your survey!
When your Builder opens, you'll need to select the 'Add to email signature' option and then 'Exclaimer'. There are three types of Exclaimer integrations and dependant upon your email provider - Microsoft, Google Workspace or Exchange.
### **The Question**
This will then take you to the first stage of your Thermometer Builder called 'The Question'.
You can walk through this section of the Thermometer builder below to create the face of your survey:
Once your survey is designed, hit the pink ‘Connect your Survey’ button at the bottom of the page to start capturing identifiable feedback.
### **Connect your survey**
You’ll see we pre-populate some of your custom fields with Exclaimer variables allowing us to pull through identifiable data about the recipient to display against each response within your Reporting.
- Recipient email address
- Sender first and last name
- Sender email address
- Subject
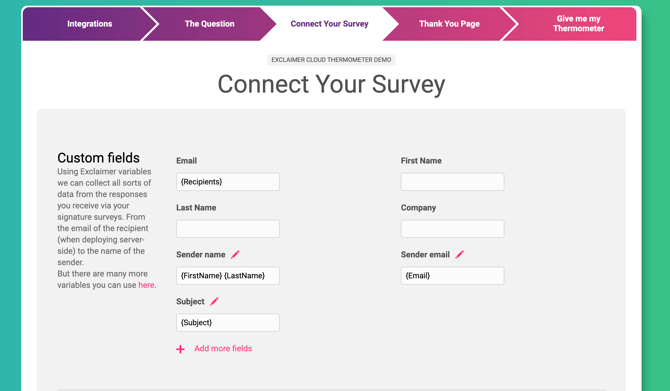
If you have additional Exclaimer variables you’d like to use then you can pop these into the spare custom fields. Click ‘Add more fields’ if you need additional custom fields.
Additional custom fields can be added, to pull additional information such as: `{Department}` or {City}.
*Please note, recipient variables will only work if you are deploying your signature server side or client side with 'Apply Recipient Settings Client-Side' feature enabled.*
*The Exclaimer Recipient variables will not work sending signatures via Gmail unless you are sending server-side or for the Update Agent.*
Once you’re happy with your custom fields you can move on to the Response Options section.
### **Email capture**
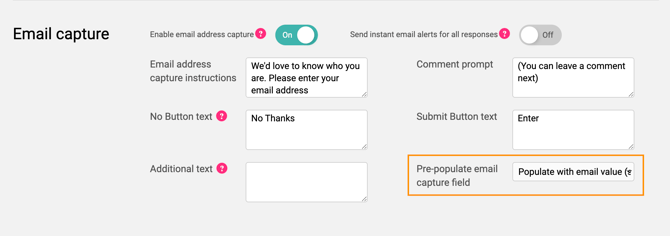
By default, Exclaimer provides us with all email addresses within the TO and CC fields. Therefore, if you are sending emails with multiple recipients; by default, the feedback will by attributed to all those email addresses.
If you enable 'Email capture', you can then prompt the end-user to choose their email address on the 'Thank you page'. This will update the response with their choice and provide single attribution back to an email address.
Enable the email capture setting, along with the 'Pre-populate email capture field (Show input)'.
If the end-user decided not to choose their email address, then the feedback will still be captured with multiple email addresses listed.
### **Response Options**
You can set up instant email alerts to be sent to internal recipients of your choice and you can choose to have them sent to different individuals depending on which colour response was clicked.
Use the slider to enable or disable the alert and the text box to enter either a single or multiple email addresses. If using multiple please ensure you separate with a comma.
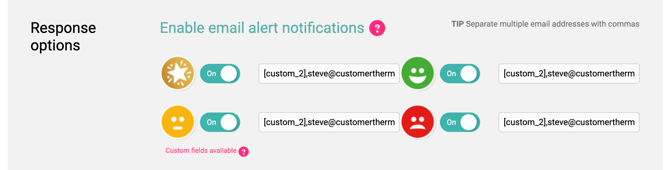
If you would like the response alerts to be automatically sent to the email sender; then add \`\[Custom\_2\]\` to the relevant response alert fields.
### **Designing your Thank You pages**
It’s time to get those Thank you pages looking beautiful!
See below for a step by step walkthrough:
### **Drivers**
[Response Drivers](https://support.customerthermometer.com/knowledge/response-drivers) give you that extra piece of insight as to why a recipient has clicked on a certain icon. They allow you to really pinpoint the areas which need improving or rewarding within your business by classifying those essential pieces of feedback.
You can add up to 8 Drivers for your respondents to choose from and tailor these depending on the rating given.
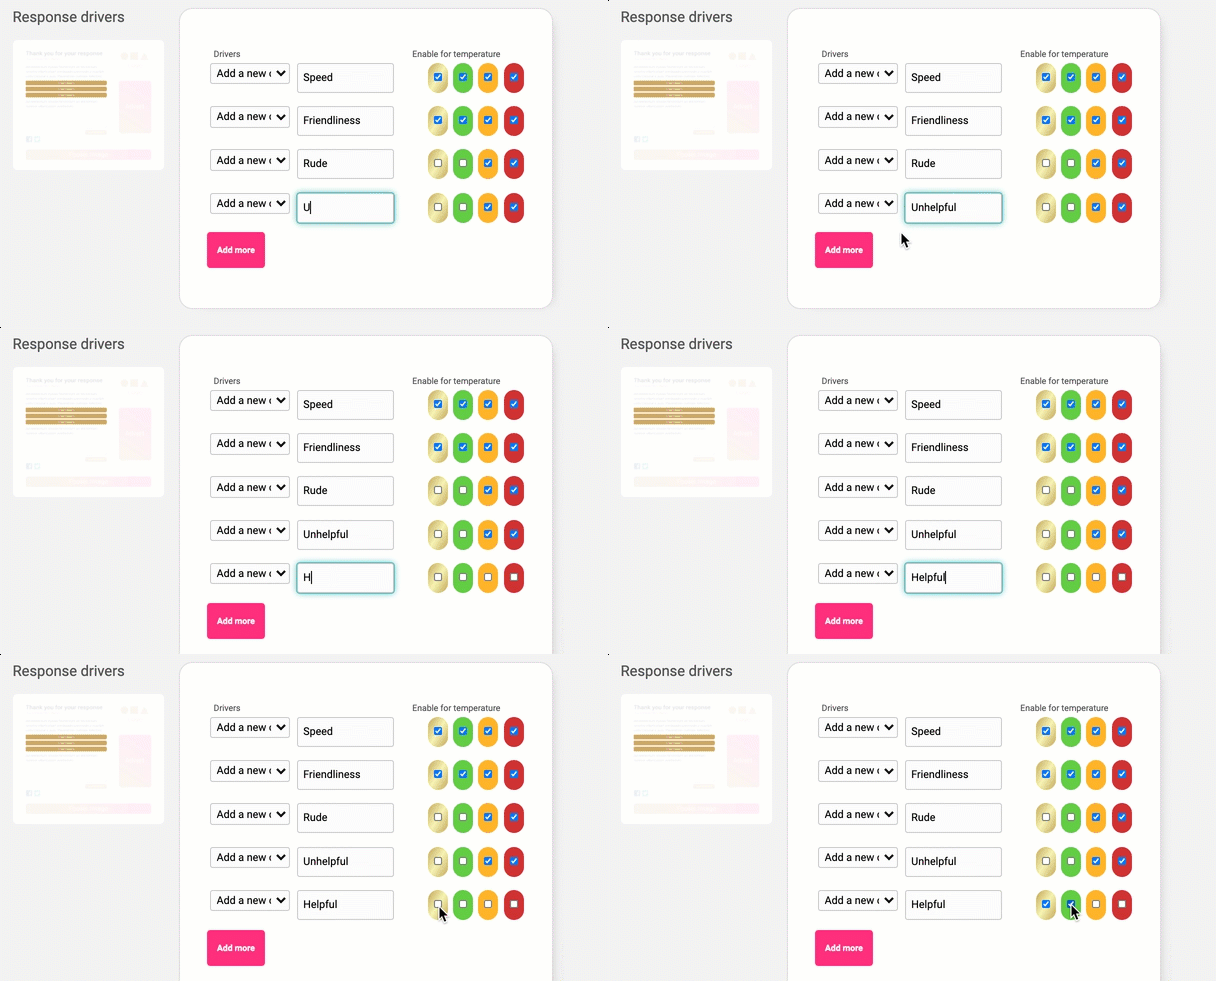
These are of course optional so you can leave this section blank if you wish.
When you’re ready hit the ‘*Give me my Thermometer*’ button… CONGRATULATIONS! Your signature survey is ready to go!
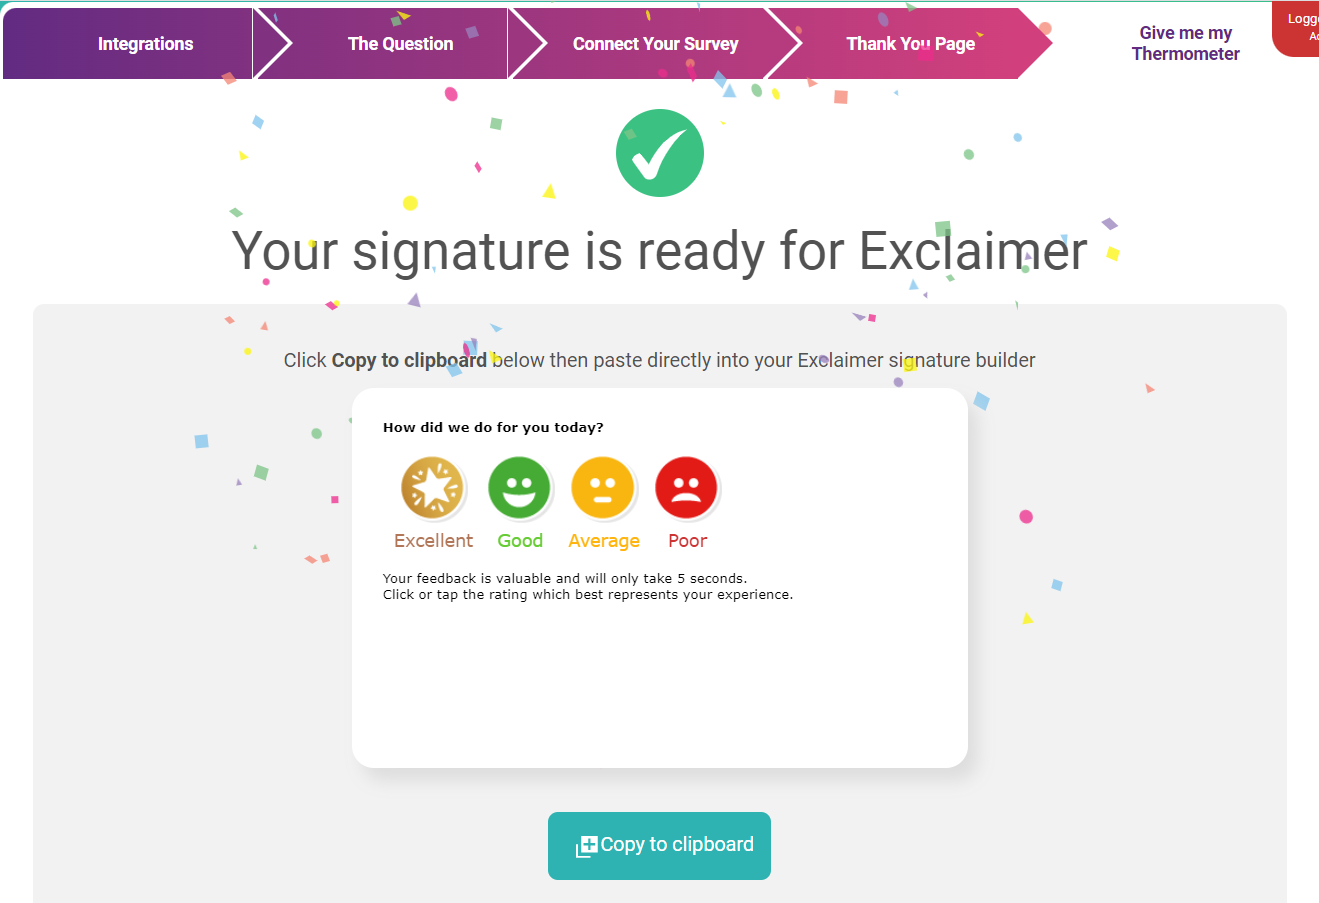
Don’t forget to hit the ‘Copy code to clipboard’ button as you’ll need this to paste into Exclaimer if using option 2 below.
### **Inserting your survey into Exclaimer**
You can add the survey to your email signature by using any one of the two methods described below. Both options provide the same functionality, it's just a preference of how to embed the survey.
If you are an **Exclaimer Pro** customer, you can use the Feedback file within the Exclaimer signature designer. This is shown in Option 1 below.
If you are an **Exclaimer Starter** or **Exclaimer Standard** customer, you would be required to use Option 3 below.
- Option 1: By linking your Customer Thermometer subscription to your Exclaimer Cloud subscription via an API key,
- Option 2: By pasting the Customer Thermometer survey into the Exclaimer Signature Designer.
- Option 3: Upload the icons within Exclaimer Signature designer and hyperlink each image.
- [Integrations](https://support.customerthermometer.com/knowledge/integrations#main-content)
- [Don't see your integration? Use our Universal Thermometer](https://support.customerthermometer.com/knowledge/integrations#dont-see-your-integration-use-our-universal-thermometer)
- [Accelo](https://support.customerthermometer.com/knowledge/integrations#accelo)
- [ActiveCampaign](https://support.customerthermometer.com/knowledge/integrations#activecampaign)
- [Administrate](https://support.customerthermometer.com/knowledge/integrations#administrate)
- [Appboy](https://support.customerthermometer.com/knowledge/integrations#appboy)
- [Atera](https://support.customerthermometer.com/knowledge/integrations#atera)
- [AutoTask](https://support.customerthermometer.com/knowledge/integrations#autotask)
- [Aweber](https://support.customerthermometer.com/knowledge/integrations#aweber)
- [BetterCloud](https://support.customerthermometer.com/knowledge/integrations#bettercloud)
- [Braze](https://support.customerthermometer.com/knowledge/integrations#braze)
- [BrightGauge](https://support.customerthermometer.com/knowledge/integrations#brightgauge)
- [CodeTwo](https://support.customerthermometer.com/knowledge/integrations#codetwo)
- [ConnectWise](https://support.customerthermometer.com/knowledge/integrations#connectwise)
- [ConstantContact](https://support.customerthermometer.com/knowledge/integrations#constantcontact)
- [Exclaimer](https://support.customerthermometer.com/knowledge/integrations#exclaimer)
- [Freshdesk](https://support.customerthermometer.com/knowledge/integrations#freshdesk)
- [GetResponse](https://support.customerthermometer.com/knowledge/integrations#getresponse)
- [Gorgias](https://support.customerthermometer.com/knowledge/integrations#gorgias)
- [Halo PSA](https://support.customerthermometer.com/knowledge/integrations#halo-psa)
- [HappyFox](https://support.customerthermometer.com/knowledge/integrations#happyfox)
- [Hubspot](https://support.customerthermometer.com/knowledge/integrations#hubspot)
- [Infusionsoft](https://support.customerthermometer.com/knowledge/integrations#infusionsoft)
- [Intercom.io](https://support.customerthermometer.com/knowledge/integrations#intercom-io)
- [Jira](https://support.customerthermometer.com/knowledge/integrations#jira)
- [Kaseya](https://support.customerthermometer.com/knowledge/integrations#kaseya)
- [Kayako](https://support.customerthermometer.com/knowledge/integrations#kayako)
- [Klaviyo](https://support.customerthermometer.com/knowledge/integrations#klaviyo)
- [Kustomer CRM](https://support.customerthermometer.com/knowledge/integrations#kustomer-crm)
- [LanDesk](https://support.customerthermometer.com/knowledge/integrations#landesk)
- [LiveAgent](https://support.customerthermometer.com/knowledge/integrations#liveagent)
- [Mac](https://support.customerthermometer.com/knowledge/integrations#mac)
- [MailChimp](https://support.customerthermometer.com/knowledge/integrations#mailchimp)
- [ManageEngine](https://support.customerthermometer.com/knowledge/integrations#manageengine)
- [Microsoft](https://support.customerthermometer.com/knowledge/integrations#microsoft)
- [N-able](https://support.customerthermometer.com/knowledge/integrations#n-able)
- [NetHelpDesk](https://support.customerthermometer.com/knowledge/integrations#nethelpdesk)
- [NetSuite](https://support.customerthermometer.com/knowledge/integrations#netsuite)
- [Oracle](https://support.customerthermometer.com/knowledge/integrations#oracle)
- [OTRS](https://support.customerthermometer.com/knowledge/integrations#otrs)
- [Pulseway PSA](https://support.customerthermometer.com/knowledge/integrations#pulseway-psa)
- [RegOnline](https://support.customerthermometer.com/knowledge/integrations#regonline)
- [Salesforce](https://support.customerthermometer.com/knowledge/integrations#salesforce)
- [Sendinblue](https://support.customerthermometer.com/knowledge/integrations#sendinblue)
- [ServiceNow](https://support.customerthermometer.com/knowledge/integrations#servicenow)
- [Shopify](https://support.customerthermometer.com/knowledge/integrations#shopify)
- [Sirportly](https://support.customerthermometer.com/knowledge/integrations#sirportly)
- [Slack](https://support.customerthermometer.com/knowledge/integrations#slack)
- [Spiceworks](https://support.customerthermometer.com/knowledge/integrations#spiceworks)
- [Splash](https://support.customerthermometer.com/knowledge/integrations#splash)
- [Syncro MSP](https://support.customerthermometer.com/knowledge/integrations#syncro-msp)
- [Team Support](https://support.customerthermometer.com/knowledge/integrations#team-support)
- [Tigerpaw](https://support.customerthermometer.com/knowledge/integrations#tigerpaw)
- [Vorex](https://support.customerthermometer.com/knowledge/integrations#vorex)
- [Zendesk](https://support.customerthermometer.com/knowledge/integrations#zendesk)
- [Zoho](https://support.customerthermometer.com/knowledge/integrations#zoho)
- [Outlook / Gmail Signatures / Outlook 365 add-in](https://support.customerthermometer.com/knowledge/outlook-gmail-signatures-outlook-365-add-in#main-content)
- [Guides](https://support.customerthermometer.com/knowledge/outlook-gmail-signatures-outlook-365-add-in#guides)
- [Outlook 365 add-in](https://support.customerthermometer.com/knowledge/outlook-gmail-signatures-outlook-365-add-in#outlook-365-add-in)
- [Comparisons](https://support.customerthermometer.com/knowledge/outlook-gmail-signatures-outlook-365-add-in#comparisons)
- [Embedded Thermometers](https://support.customerthermometer.com/knowledge/embedded-thermometers#main-content)
- [Custom fields & data](https://support.customerthermometer.com/knowledge/embedded-thermometers#custom-fields-data)
- [Customization](https://support.customerthermometer.com/knowledge/embedded-thermometers#customization)
- [Email Thermometers](https://support.customerthermometer.com/knowledge/email-thermometers#main-content)
- [Required steps](https://support.customerthermometer.com/knowledge/email-thermometers#required-steps)
- [Custom fields & data](https://support.customerthermometer.com/knowledge/email-thermometers#custom-fields-data)
- [Customization](https://support.customerthermometer.com/knowledge/email-thermometers#customization)
- [Reporting and Alerts](https://support.customerthermometer.com/knowledge/reporting-and-alerts#main-content)
- [Reports](https://support.customerthermometer.com/knowledge/reporting-and-alerts#reports)
- [Response Drivers](https://support.customerthermometer.com/knowledge/reporting-and-alerts#response-drivers)
- [Calculations](https://support.customerthermometer.com/knowledge/reporting-and-alerts#calculations)
- [Alerting](https://support.customerthermometer.com/knowledge/reporting-and-alerts#alerting)
- [Management](https://support.customerthermometer.com/knowledge/reporting-and-alerts#management)
- [Net Promoter Score (NPS)](https://support.customerthermometer.com/knowledge/net-promoter-score-nps)
- [Troubleshooting](https://support.customerthermometer.com/knowledge/troubleshooting#main-content)
- [Reporting Troubleshooting](https://support.customerthermometer.com/knowledge/troubleshooting#reporting-troubleshooting)
- [Duplicate Feedback/Responses Troubleshooting](https://support.customerthermometer.com/knowledge/troubleshooting#duplicate-feedback-responses-troubleshooting)
- [Thermometer Builder Troubleshooting](https://support.customerthermometer.com/knowledge/troubleshooting#thermometer-builder-troubleshooting)
- [Email Thermometer Troubleshooting](https://support.customerthermometer.com/knowledge/troubleshooting#email-thermometer-troubleshooting)
- [Advanced](https://support.customerthermometer.com/knowledge/advanced#main-content)
- [Responses, Duplicates & False Clicks](https://support.customerthermometer.com/knowledge/advanced#responses-duplicates-false-clicks)
- [Outputs & APIs](https://support.customerthermometer.com/knowledge/advanced#outputs-apis)
- [Tablets](https://support.customerthermometer.com/knowledge/advanced#tablets)
- [Customization](https://support.customerthermometer.com/knowledge/advanced#customization)
- [Account Admin](https://support.customerthermometer.com/knowledge/account-admin#main-content)
- [Users & Security](https://support.customerthermometer.com/knowledge/account-admin#users-security)
- [Account Management & Billing](https://support.customerthermometer.com/knowledge/account-admin#account-management-billing)
[](https://www.customerthermometer.com)
Copyright © 2026, Customer Thermometer Technology Ltd - THE customer satisfaction survey