---
title: Setting up a ManageEngine Thermometer
description: Create and embed customizable surveys in ManageEngine and ManageEngine ServiceDesk Plus emails to capture instant, detailed customer feedback easily.
---
[Skip to content](https://support.customerthermometer.com/knowledge/setting-up-a-manageengine-thermometer#main-content)
English
Show submenu for translations
[Contact the Ministry of Magic](https://support.customerthermometer.com/knowledge/kb-tickets/new)
[](https://www.customerthermometer.com/)
- [App link](https://app.customerthermometer.com/)
- [Survey tips & advice](https://www.customerthermometer.com/resources/how-to-embed-customer-thermometer-into-your-business/)
- [System status](https://status.customerthermometer.com/)
Open main navigation
Close main navigation
- [App link](https://app.customerthermometer.com/)
- [Survey tips & advice](https://www.customerthermometer.com/resources/how-to-embed-customer-thermometer-into-your-business/)
- [System status](https://status.customerthermometer.com/)
- English
Show submenu for translations
- [Contact the Ministry of Magic](https://support.customerthermometer.com/knowledge/kb-tickets/new)
How can we help you?
- There are no suggestions because the search field is empty.
1. [Brilliant help, moments away.](https://support.customerthermometer.com/knowledge)
2. [Integrations](https://support.customerthermometer.com/knowledge/integrations)
3. [ManageEngine](https://support.customerthermometer.com/knowledge/integrations#manageengine)
July 9, 2026
# Setting up a ManageEngine Thermometer
Once logged in to Customer Thermometer head to Thermometers \> Add new Thermometer \> Helpdesk \> Select ManageEngine
This will then open up your Thermometer Builder where you can create your survey and thank you pages.
### **The Question**
This section of the builder is where you can choose the design of your survey including naming your Thermometer, adding your question and selecting your survey icons or uploading your own bespoke icons. The below video will demo all the customization which can be achieved in this section.
### **Connect your survey**
In order for identifiable data about your recipients and senders to display within your reporting area, you first need to capture it. This would be done at the point that the email is sent, by including merge fields/variables from ManageEngine within the Thermometer code.
The most common ManageEngine variables are shown below for you, however, you can add more if you wish.
These variables will capture the corresponding pieces of identifiable data from ManageEngine and present them alongside the recipient's feedback rating within your reporting.
### **Response options**
In your *Connect your survey* area, you have additional response options. Here you can choose whether to enable a [lockout](https://support.customerthermometer.com/knowledge/lockout-how-to-limit-responses) and set your [email alert notifications](https://support.customerthermometer.com/knowledge/how-to-set-up-email-alert-notifications).
Separate multiple email addresses with commas.
### **Thank you page**
It’s time to get those Thank you pages looking beautiful!
See below for a step by step walkthrough:
### **Embedding your survey into ManageEngine**
Once you've finished designing your Thermometer, the 'Give me my Thermometer' section will provide you with your finished survey to embed into ManageEngine. Highlight your survey and copy the entire thing as you'll need to embed this into ManageEngine.
Inside ManageEngine, visit Setup \> Notification Rules. There are various options for where to add the survey buttons:
- E-mail end-user when a request is resolved.
- Acknowledge requester by e-mail when the request is closed.
- Acknowledge requester by e-mail when the request is updated.
**Other implementations**
Alternatively, you could customize a Resolution Template within Setup \> Templates & Forms \> Resolution Template.
Or you could customize the survey template within Setup \> User Survey \> Survey Settings.
**Adding the Customer Thermometer survey to a template**
All scenarios above follow the same instructions of adding the HTML output from Customer Thermometer into a template. In the example below, we'll be focusing on the notification template:
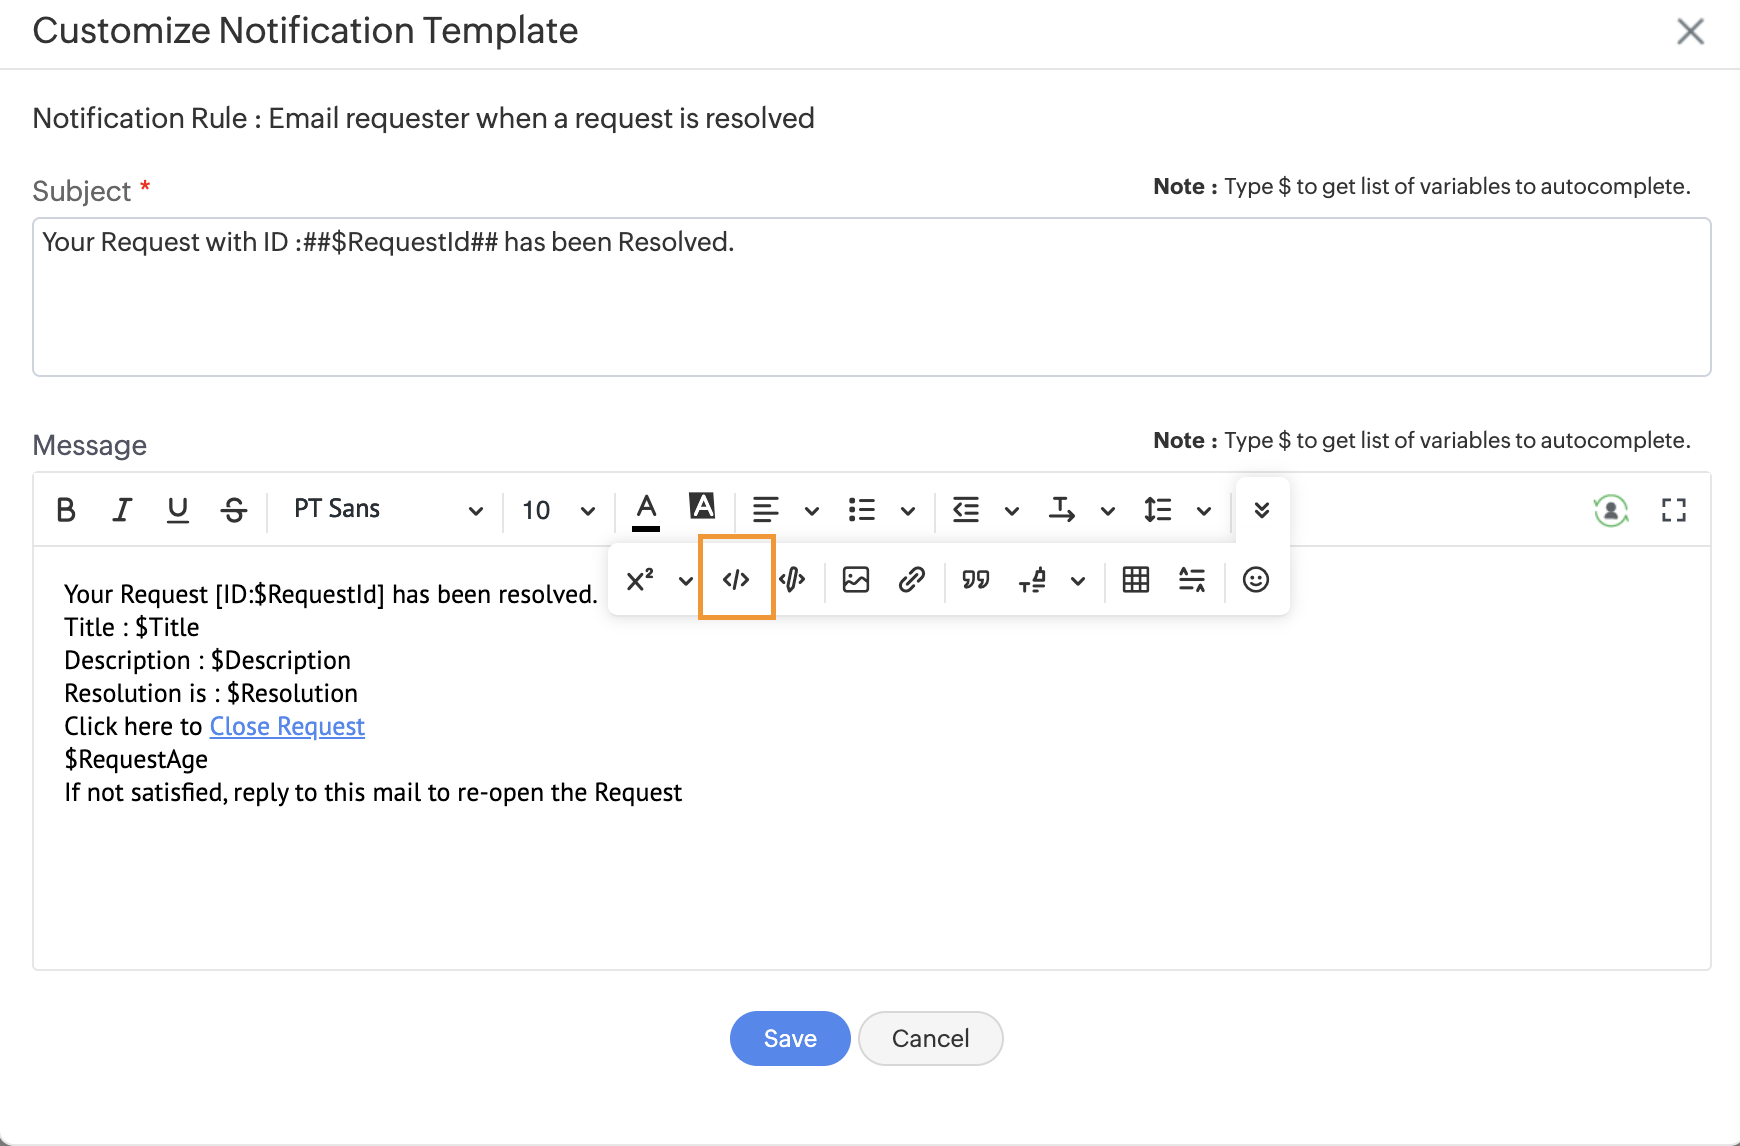
Clicking on the "Add HTML" button, allows you to insert the full survey code within your notification template.
By default, the requesters' details along with the request ID and the Technician are included in the Customer Thermometer reporting. Should you wish to collect further data, any variable that is available within the ManageEngine template can be added to the custom fields within Customer Thermometer.
### **The final result**
Depending on the configuration/template that you’ve chosen, when a requested is updated / or resolved, your outbound email will contain the feedback buttons directly within the email itself:
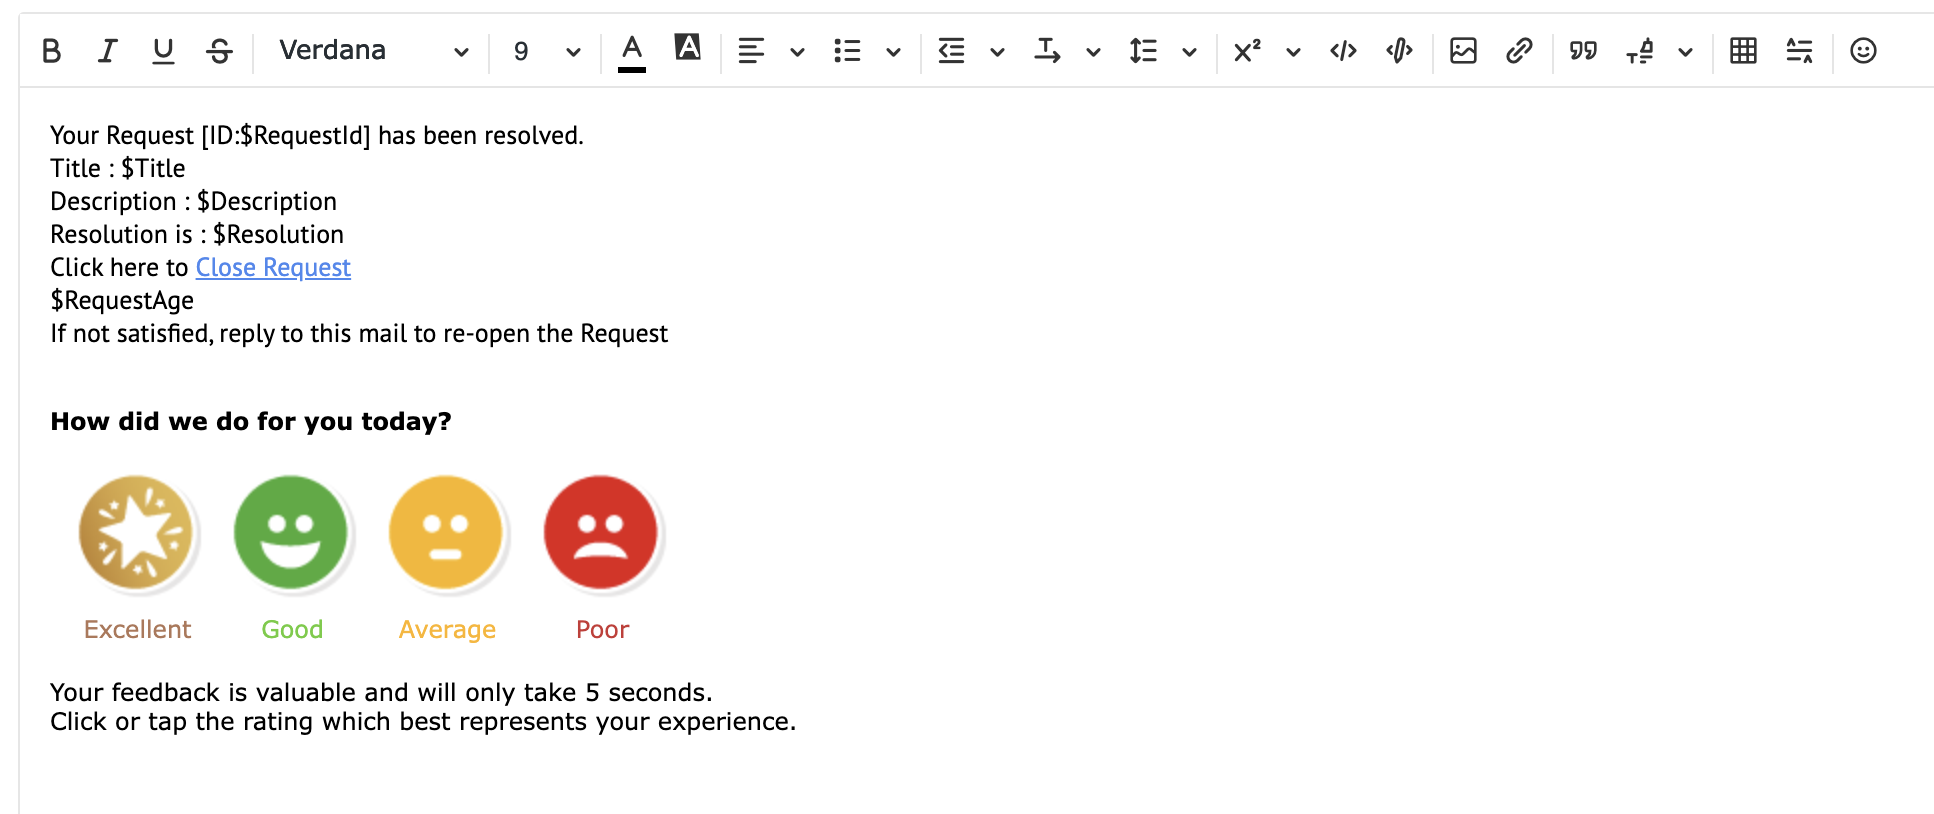
When a customer clicks a rating, the response is instantly captured within your Customer Thermometer reporting area, alongside the recipient details, request ID and technician details – you can then use the Customer Thermometer reporting suite to generate a variety of reports drawing on this data.
- [Integrations](https://support.customerthermometer.com/knowledge/integrations#main-content)
- [Don't see your integration? Use our Universal Thermometer](https://support.customerthermometer.com/knowledge/integrations#dont-see-your-integration-use-our-universal-thermometer)
- [Accelo](https://support.customerthermometer.com/knowledge/integrations#accelo)
- [ActiveCampaign](https://support.customerthermometer.com/knowledge/integrations#activecampaign)
- [Administrate](https://support.customerthermometer.com/knowledge/integrations#administrate)
- [Appboy](https://support.customerthermometer.com/knowledge/integrations#appboy)
- [Atera](https://support.customerthermometer.com/knowledge/integrations#atera)
- [AutoTask](https://support.customerthermometer.com/knowledge/integrations#autotask)
- [Aweber](https://support.customerthermometer.com/knowledge/integrations#aweber)
- [BetterCloud](https://support.customerthermometer.com/knowledge/integrations#bettercloud)
- [Braze](https://support.customerthermometer.com/knowledge/integrations#braze)
- [BrightGauge](https://support.customerthermometer.com/knowledge/integrations#brightgauge)
- [CodeTwo](https://support.customerthermometer.com/knowledge/integrations#codetwo)
- [ConnectWise](https://support.customerthermometer.com/knowledge/integrations#connectwise)
- [ConstantContact](https://support.customerthermometer.com/knowledge/integrations#constantcontact)
- [Exclaimer](https://support.customerthermometer.com/knowledge/integrations#exclaimer)
- [Freshdesk](https://support.customerthermometer.com/knowledge/integrations#freshdesk)
- [GetResponse](https://support.customerthermometer.com/knowledge/integrations#getresponse)
- [Gorgias](https://support.customerthermometer.com/knowledge/integrations#gorgias)
- [Halo PSA](https://support.customerthermometer.com/knowledge/integrations#halo-psa)
- [HappyFox](https://support.customerthermometer.com/knowledge/integrations#happyfox)
- [Hubspot](https://support.customerthermometer.com/knowledge/integrations#hubspot)
- [Infusionsoft](https://support.customerthermometer.com/knowledge/integrations#infusionsoft)
- [Intercom.io](https://support.customerthermometer.com/knowledge/integrations#intercom-io)
- [Jira](https://support.customerthermometer.com/knowledge/integrations#jira)
- [Kaseya](https://support.customerthermometer.com/knowledge/integrations#kaseya)
- [Kayako](https://support.customerthermometer.com/knowledge/integrations#kayako)
- [Klaviyo](https://support.customerthermometer.com/knowledge/integrations#klaviyo)
- [Kustomer CRM](https://support.customerthermometer.com/knowledge/integrations#kustomer-crm)
- [LanDesk](https://support.customerthermometer.com/knowledge/integrations#landesk)
- [LiveAgent](https://support.customerthermometer.com/knowledge/integrations#liveagent)
- [Mac](https://support.customerthermometer.com/knowledge/integrations#mac)
- [MailChimp](https://support.customerthermometer.com/knowledge/integrations#mailchimp)
- [ManageEngine](https://support.customerthermometer.com/knowledge/integrations#manageengine)
- [Microsoft](https://support.customerthermometer.com/knowledge/integrations#microsoft)
- [N-able](https://support.customerthermometer.com/knowledge/integrations#n-able)
- [NetHelpDesk](https://support.customerthermometer.com/knowledge/integrations#nethelpdesk)
- [NetSuite](https://support.customerthermometer.com/knowledge/integrations#netsuite)
- [Oracle](https://support.customerthermometer.com/knowledge/integrations#oracle)
- [OTRS](https://support.customerthermometer.com/knowledge/integrations#otrs)
- [Pulseway PSA](https://support.customerthermometer.com/knowledge/integrations#pulseway-psa)
- [RegOnline](https://support.customerthermometer.com/knowledge/integrations#regonline)
- [Salesforce](https://support.customerthermometer.com/knowledge/integrations#salesforce)
- [Sendinblue](https://support.customerthermometer.com/knowledge/integrations#sendinblue)
- [ServiceNow](https://support.customerthermometer.com/knowledge/integrations#servicenow)
- [Shopify](https://support.customerthermometer.com/knowledge/integrations#shopify)
- [Sirportly](https://support.customerthermometer.com/knowledge/integrations#sirportly)
- [Slack](https://support.customerthermometer.com/knowledge/integrations#slack)
- [Spiceworks](https://support.customerthermometer.com/knowledge/integrations#spiceworks)
- [Splash](https://support.customerthermometer.com/knowledge/integrations#splash)
- [Syncro MSP](https://support.customerthermometer.com/knowledge/integrations#syncro-msp)
- [Team Support](https://support.customerthermometer.com/knowledge/integrations#team-support)
- [Tigerpaw](https://support.customerthermometer.com/knowledge/integrations#tigerpaw)
- [Vorex](https://support.customerthermometer.com/knowledge/integrations#vorex)
- [Zendesk](https://support.customerthermometer.com/knowledge/integrations#zendesk)
- [Zoho](https://support.customerthermometer.com/knowledge/integrations#zoho)
- [Outlook / Gmail Signatures / Outlook 365 add-in](https://support.customerthermometer.com/knowledge/outlook-gmail-signatures-outlook-365-add-in#main-content)
- [Guides](https://support.customerthermometer.com/knowledge/outlook-gmail-signatures-outlook-365-add-in#guides)
- [Outlook 365 add-in](https://support.customerthermometer.com/knowledge/outlook-gmail-signatures-outlook-365-add-in#outlook-365-add-in)
- [Comparisons](https://support.customerthermometer.com/knowledge/outlook-gmail-signatures-outlook-365-add-in#comparisons)
- [Embedded Thermometers](https://support.customerthermometer.com/knowledge/embedded-thermometers#main-content)
- [Custom fields & data](https://support.customerthermometer.com/knowledge/embedded-thermometers#custom-fields-data)
- [Customization](https://support.customerthermometer.com/knowledge/embedded-thermometers#customization)
- [Email Thermometers](https://support.customerthermometer.com/knowledge/email-thermometers#main-content)
- [Required steps](https://support.customerthermometer.com/knowledge/email-thermometers#required-steps)
- [Custom fields & data](https://support.customerthermometer.com/knowledge/email-thermometers#custom-fields-data)
- [Customization](https://support.customerthermometer.com/knowledge/email-thermometers#customization)
- [Reporting and Alerts](https://support.customerthermometer.com/knowledge/reporting-and-alerts#main-content)
- [Reports](https://support.customerthermometer.com/knowledge/reporting-and-alerts#reports)
- [Response Drivers](https://support.customerthermometer.com/knowledge/reporting-and-alerts#response-drivers)
- [Calculations](https://support.customerthermometer.com/knowledge/reporting-and-alerts#calculations)
- [Alerting](https://support.customerthermometer.com/knowledge/reporting-and-alerts#alerting)
- [Management](https://support.customerthermometer.com/knowledge/reporting-and-alerts#management)
- [Net Promoter Score (NPS)](https://support.customerthermometer.com/knowledge/net-promoter-score-nps)
- [Troubleshooting](https://support.customerthermometer.com/knowledge/troubleshooting#main-content)
- [Reporting Troubleshooting](https://support.customerthermometer.com/knowledge/troubleshooting#reporting-troubleshooting)
- [Duplicate Feedback/Responses Troubleshooting](https://support.customerthermometer.com/knowledge/troubleshooting#duplicate-feedback-responses-troubleshooting)
- [Thermometer Builder Troubleshooting](https://support.customerthermometer.com/knowledge/troubleshooting#thermometer-builder-troubleshooting)
- [Email Thermometer Troubleshooting](https://support.customerthermometer.com/knowledge/troubleshooting#email-thermometer-troubleshooting)
- [Advanced](https://support.customerthermometer.com/knowledge/advanced#main-content)
- [Responses, Duplicates & False Clicks](https://support.customerthermometer.com/knowledge/advanced#responses-duplicates-false-clicks)
- [Outputs & APIs](https://support.customerthermometer.com/knowledge/advanced#outputs-apis)
- [Tablets](https://support.customerthermometer.com/knowledge/advanced#tablets)
- [Customization](https://support.customerthermometer.com/knowledge/advanced#customization)
- [Account Admin](https://support.customerthermometer.com/knowledge/account-admin#main-content)
- [Users & Security](https://support.customerthermometer.com/knowledge/account-admin#users-security)
- [Account Management & Billing](https://support.customerthermometer.com/knowledge/account-admin#account-management-billing)
[](https://www.customerthermometer.com)
Copyright © 2026, Customer Thermometer Technology Ltd - THE customer satisfaction survey