Writeback for Salesforce cases
This article describes how to write back a Customer Thermometer rating against the Case object. If you are using an objectID within your custom fields, you can follow the guide:
It is possible many of the steps below them will already be set up within your instance. You may therefore be able to skip a few elements.
Step 1 – Create a new Webhook
Firstly, you’ll need to create a new webhook by following the Configuring a webhook guide . You’ll need to sign into Zapier, head to ‘Make a Zap!’ and then search for ‘Webhook’. Select ‘Catch Hook’ and hit ‘Save and Continue’ to create your URL which will be copied into your webhook within Customer Thermometer.
In Customer Thermometer, you’ll need to add a name for your Webhook, paste in your URL from Zapier, select your event triggers, select your linked Thermometer(s) and hit save. If you get stuck, we recommend running through the configure a webhook user-guide mentioned above.
Scroll down to the bottom of the Settings tab once more and select the ‘Test fire webhook’ button to test your webhook. The status should state green if successful.
Step 2 – Set up relevant custom fields
Next, within Salesforce, you need to create the custom fields that we’ll be storing the Customer Thermometer rating against.
You can do this via:
Visit Setup > Object Manager > Object (Account, Case, Contact, Opportunity… etc) > Fields & Relationships.
If you would like to show the CSAT rating, set up a new Picklist field.
If you would like to show the full NPS rating (1-10), create a new Integer field.
We’ve called it “CT rating” – though, it can be called anything you like.
 The above example shows the picklist for writing back CSAT rating.
In order to view the data, make sure this field is then added to the relevant user views.
This process is shown for Salesforce Lightening. For Classic, you would go to:
Visit BUILD > Customize > Object (Account, Case, Contact, Opportunity… etc) > Fields
Step 3 – Icons instead of text (Optional)
This is a nice to have, but a powerful addition for CSAT ratings. If you are using full NPS (0-10), then skip ahead.
Create a second custom field in your chosen Custom Object. This will then be directly linked, via formula to the original CT Rating field, we created earlier.
Visit BUILD > Customize > Object (Account, Case, Contact, Opportunity… etc) > Fields
Set up a new Formula (Text) field. We’ve called it “CT Temperature”.
In the formula area, enter the following code:
OBJECTNAME(1,
If(CONTAINS(Text(CT_rating__c),"Gold"),1,0),
IMAGE("/resource/CTGold","Gold",30,30),
If(CONTAINS(Text(CT_rating__c),"Green"),1,0),
IMAGE("/resource/CTGreen","Green",30,30),
If(CONTAINS(Text(CT_rating__c),"Yellow"),1,0),
IMAGE("/resource/CTYellow","Yellow",30,30),
If(CONTAINS(Text(CT_rating__c),"Red"),1,0),
IMAGE("/resource/CTRed","Red",30,30),
IMAGE("/resource/CTNone","None",30,30)
)
The word OBJECTNAME needs to be related to the chosen object, for cases, it would be CASE.
Save that field and then you’ll need to upload the 5 icons which the Formula refers to.
Download each of the 5 images below to your hard drive.
Right click and choose “file save as” (or the equivalent) on each image:


The image upload area is hidden away in BUILD > Develop > Static Resources
Click ‘NEW’ in the Static Resources screen and then upload each image separately.
Ensure you name the images exactly as they are referred to in the Formula above.
Step 4 – Test it!
Return to Zapier and click the ‘Ok, I did this’ to take you to your test which you can review by hitting the arrow. You should see the test webhook result that was fired from Customer Thermometer. Then click continue.
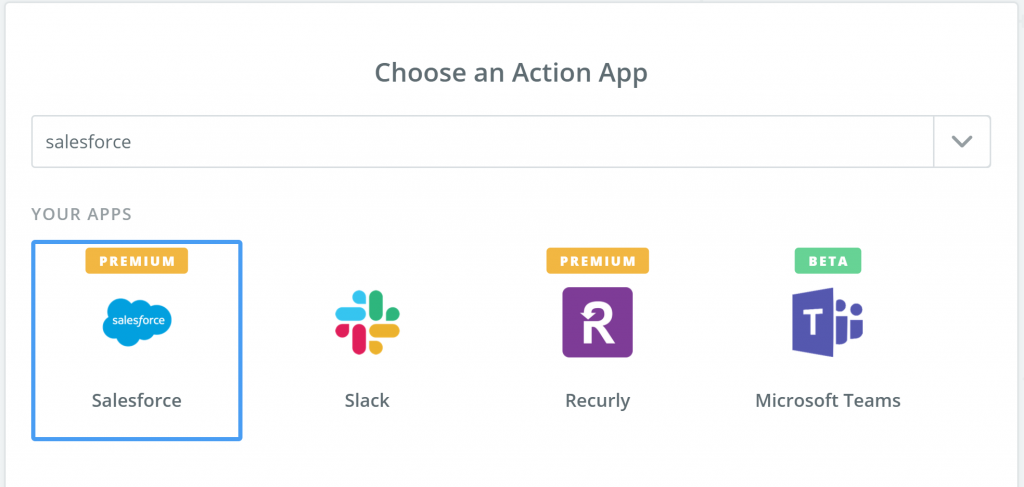
Step 5 – Choose an Action App
Follow the ‘Your Zap currently lacks an Action step. Add one now!’ button and select Salesforce.
We then want to choose ‘Update Record’ as the action.
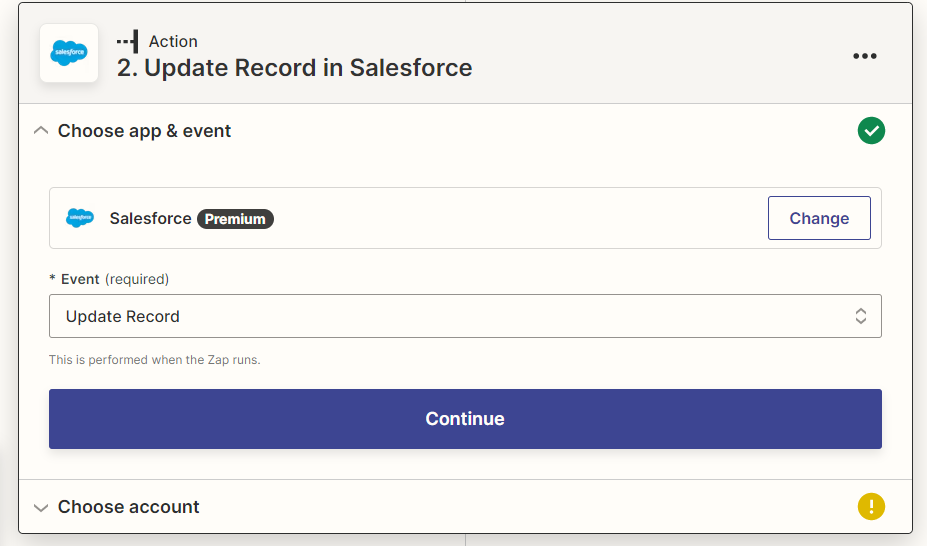
Next, authenticate your Salesforce account with Zapier. It’s nice and simple and all from one click (Connect an Account).
Once authenticated, click Continue and we’re onto setting up the template. Here is where the magic happens!
You should then choose the Case in the Object field.
The “Record to Update” would then be set to use the relevant custom field that is fed from the webhook.
Within the Record to Update field, is where the Record ID will be pulled in.
In this example, we are updating the Case Object, matching using the value in Custom 1 and then also updating the CT Rating field, which we created earlier. Further down the page, you’ll find the Custom Field (CT rating) from Salesforce that we added in Step 2.

Then Continue. If you’ve got no errors, we’ll need to use the ‘Skip the test’ as the data isn’t available within Zapier yet.
Then Continue again.
Your Salesforce setup is now complete. Remember to switch your Zap on and then click a rating from your Salesforce Thermometer to give it a try!
Quick Summary:
1) Trigger – Catch Hook
2) Action – Update Record in SFDC
2.1) Set Object (eg: Case)
2.2) Set Record to Update
2.3) Set CT Rating with value (either Response or NPS Rating depending on Thermometer)