Webhooks overview
Webhooks allow you to automatically trigger an action with a 3rd party application, when something happens inside your Customer Thermometer account.
Webhooks are available across all Customer Thermometer plans, including trialists.
Examples of usage
Before we explain how to set up webhooks, let’s look at some ways they can be used.
1) You could display incoming Customer Thermometer ratings and comments inside a Slack channel (with the help of Zapier):

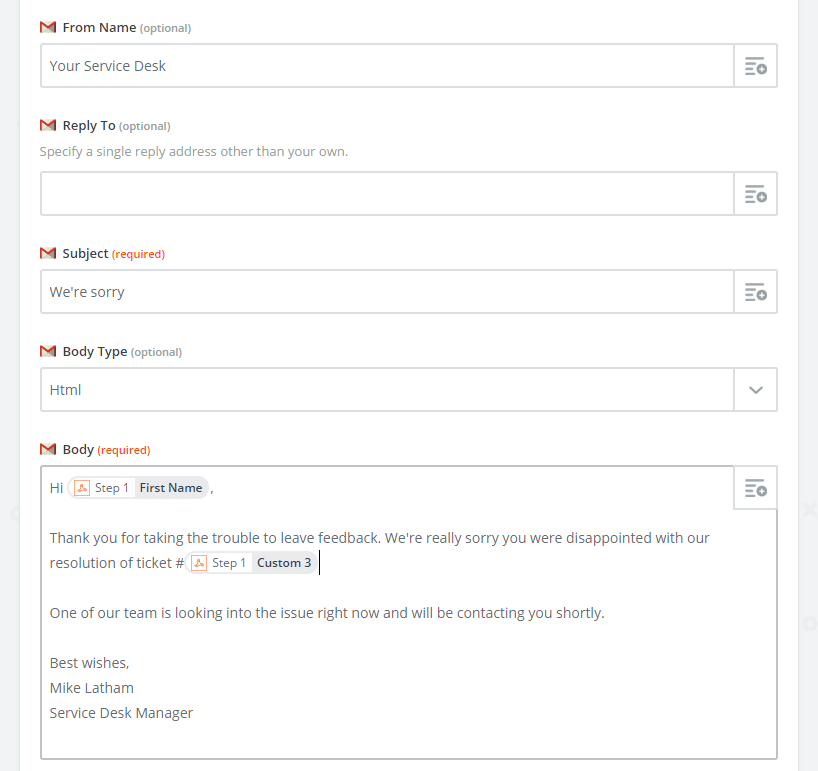
2) You could trigger automated response emails to disappointed customers (also with the help of Zapier):
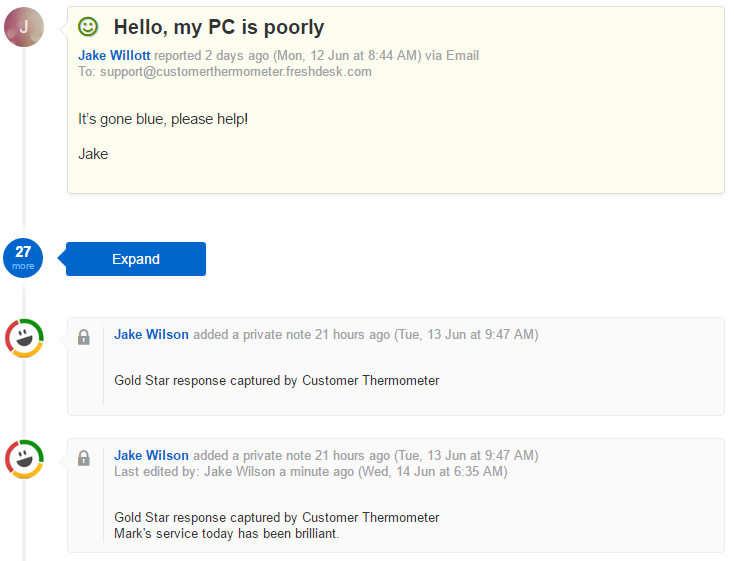
3) For those 3rd party tools where we don’t yet write responses back directly into it – you now can (with the help of Zapier).
In the example below, we’re pushing ratings and comments into Freshdesk’s excellent support desk.
4) In addition, you can now connect Customer Thermometer responses and comments into legacy systems – create ‘endpoints’ within your internal helpdesk and push your responses directly into it.
In short, the world’s your oyster when it comes to triggering events, based on incoming Customer Thermometer ratings.
An introduction to webhooks
If you’d like to know what they are and how they work, take a look at the guide below.
What is a webhook?A webhook is a mechanism of providing a reaction to an event. They are also sometimes referred to as a web callback or HTTP push API.
Customer Thermometer webhooks can provide other applications with real-time information. They deliver data to other applications as it happens, meaning you get data immediately.
Webhooks are a useful tool for executing an action in another app or system after a specific response event happens – for example. when a customer hits a gold star, or leaves a comment on a red response.
They can be used as alerts to keep your systems and partner applications in sync with response events that occur within Customer Thermometer.
Customer Thermometer can send webhooks to any publicly accessible server. When an event in Customer Thermometer triggers a webhook (e.g., a red response is received), Customer Thermometer will attempt to send this notification to the endpoint(s) you specify. You can specify an unlimited number of endpoints for any combination of Thermometers.
A single event may be sent to many webhook endpoints. Note: Your endpoint must be reachable at ports 80 (HTTP) or 443 (HTTPS). Webhook event data is sent as JSON via the IP address: 109.169.28.117 Your endpoint must respond within 5 seconds Your endpoint must respond with a 2XX status code (e.g., 200, 201, 204, etc.)
What types of webhook can be triggered?
Webhooks can be registered for any combination of response ratings, comments and response drivers:

Are webhooks secure?
You have the option to include Basic Authentication (Basic Auth) when setting up your webhooks. It allows you to provide the username and password associated with the HTTP endpoint (this is not your Customer Thermometer username and password).
Almost all web servers can be configured to require a user name and password for access to a URL. When webhook data is sent, the Basic Auth fields are included in the header of the HTTP request. Using Basic Auth increases the security of your webhook event data and ensures that the data delivered originates from Customer Thermometer.
Verifying your webhook
As an additional layer of security, each webhook includes a X-Ct-Hmac-Sha256 header which is generated using your unique shared secret, along with the data sent in the request.
You can see your shared secret at the bottom of the ‘View endpoint’ page.

To verify that the request came from Customer Thermometer, compute the HMAC digest according to the following algorithm and compare it to the value in the X-Ct-Hmac-Sha256 header. If they match, you can be sure that the webhook was sent from Customer Thermometer and the data has not been compromised.
Below is a simple example in PHP script of how one might verify a webhook request:
Below is a simple example in PHP script of how one might verify a webhook request:
<!--?php

define('CT_WEBHOOKS_SECRET', 'my_shared_secret'); // e.g. 02ee43a0c82e42c3f79701cc7db8389f3fcd4ac1dace9ec92592220964e75d59

function verify_webhook($data, $hmac_header, $date_header)
{
$content = "Date: " . $date_header . "\n" . $data;
$calculated_hmac = base64_encode(hash_hmac('sha256', $content, CT_WEBHOOKS_SECRET, true));
return ($hmac_header == $calculated_hmac);
}

$hmac_header = $_SERVER['HTTP_X_CT-Hmac_SHA256'];
$date_header = $_SERVER['HTTP_DATE'];
$data = file_get_contents('php://input' [^] [^]);

$verified = verify_webhook($data, $hmac_header, $date_header);
error_log('Webhook verified: '.var_export($verified, true)); //check error.log to see the result

?>
CSRF tokens
If you’re using Rails, Django, or another web framework, your site may automatically check that every POST request contains a CSRF token.
This is an important security feature that helps protect you and your users from cross-site request forgery attempts.
However, this security measure may also prevent your site from processing legitimate webhooks. Therefore, you will need to disable ‘protect from forgery’ on any sites run these various web frameworks.
Overview of webhooks admin
You can reach the webhooks screen via the top menu link “Push Options” – from there, there is a section for Webhooks.
Initially it will be empty of course. Over time, it might look something like this:
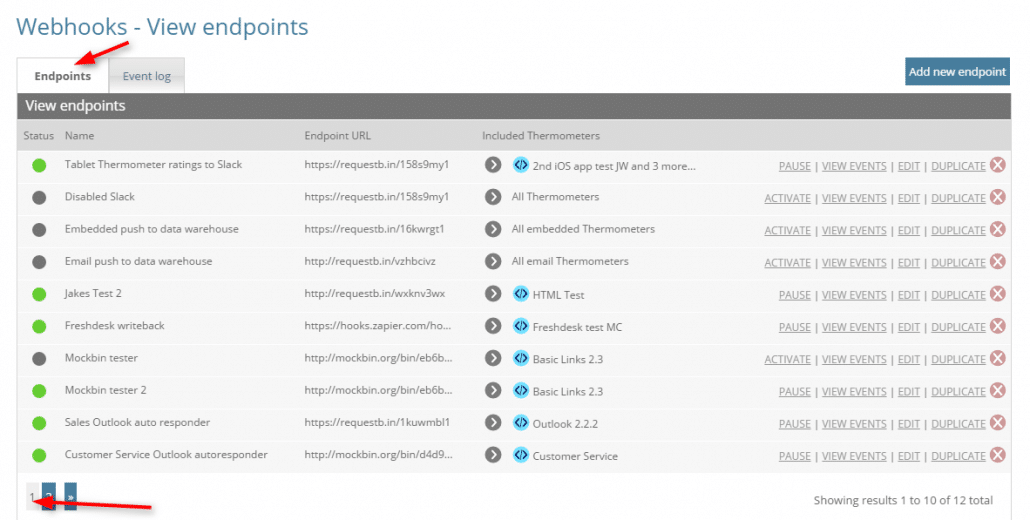
The screen shows each individual webhook created, the endpoint URL and the Thermometers which will trigger it. The dark grey chevron icon will expand the list to show the Thermometers included within that webhook.
Note that Email Thermometers are designated by the yellow envelope icon, Embedded Thermometers are designated by the blue tag icon.
Note the pagination at the bottom.
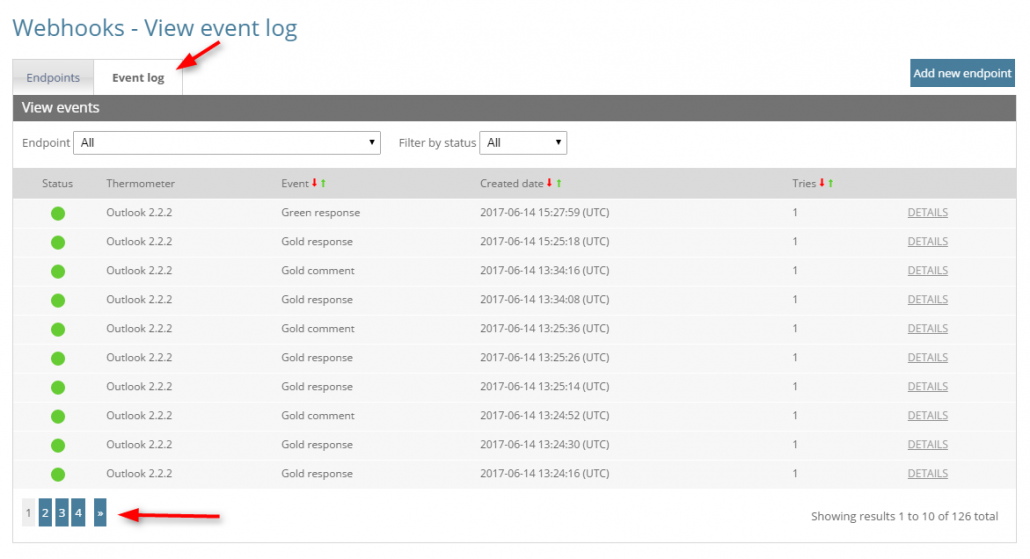
The second tab shows the event log – a record of every webhook which has fired:
Again, note the pagination at the bottom.
How to create a new webhook
Once you’ve decided what you’d like to trigger, based on a response or comment from a particular Thermometer(s), you will need to firstly add a new endpoint. Secondly, you’ll attach that endpoint to a specific Thermometer or set of Thermometers.
Once that process is complete, each time a response is received by one of those Thermometers, the webhook will fire to that endpoint.
This guide below explains how.
Configuring a webhook
You can configure your webhooks by going to the drop-down in the top right-hand corner and selecting Automations.
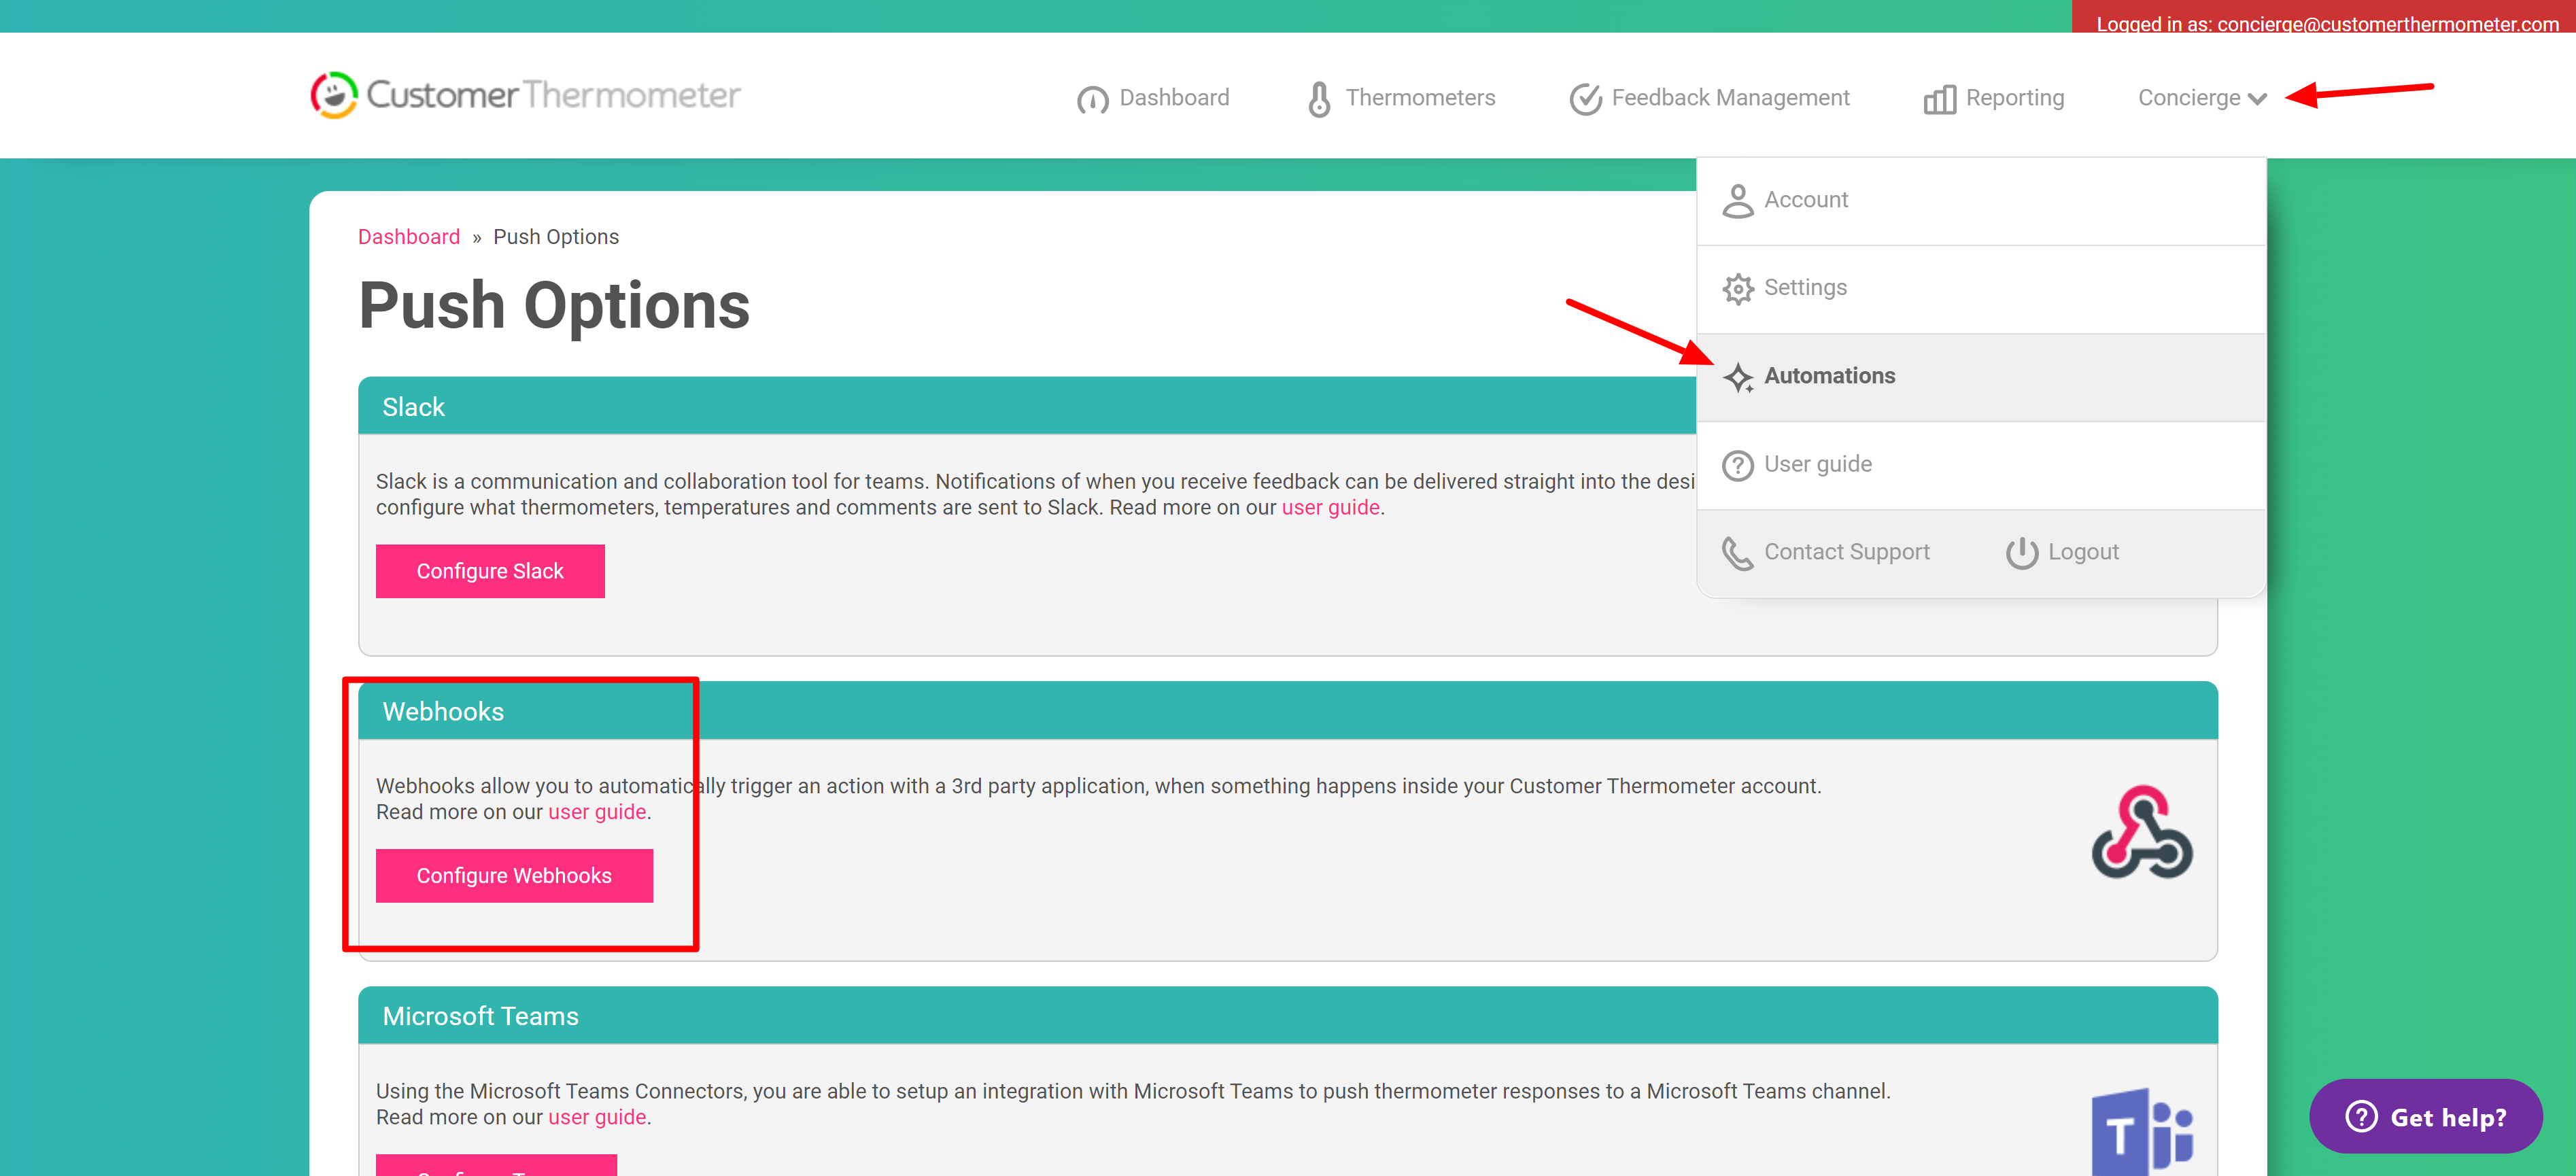
Click “Configure Webhooks’ > ‘+ Add New Endpoint’ and give your webhook a name.
To get started with webhooks – we recommend looking at Zapier.
You’ll need to sign into Zapier, head to ‘Make a Zap!’ and then search for ‘webhook’. Select ‘Catch Hook’ and hit ‘Save and Continue’ and then copy the URL created to insert into the endpoint URL section within Customer Thermometer. The URL created is where you want to receive notifications. We strongly recommended using HTTPS wherever possible.
Next, choose the events that you want to trigger your webhook. You can select any combination you wish. Then go to Linked Thermometers and select the Thermometer(s) you would like the Webhook to be linked to.
Authentication
You next have the option to include Basic Authentication (Basic Auth) when setting up your webhooks. It allows you to provide the username and password associated with the HTTP endpoint (this is not your Customer Thermometer username and password).
Almost all web servers can be configured to require a user name and password for access to a URL. When webhook data is sent, the Basic Auth fields are included in the header of the HTTP request.
Using Basic Auth increases the security of your webhook event data and ensures that the data delivered originates from Customer Thermometer.
Note, if you’re using Zapier, this isn’t needed.
Testing
The final stage of the process is to click “Test fire webhook“. This will confirm the endpoint is configured correctly.
If the test doesn’t reply with a Status 200 (delivered) then something’s wrong. Check your URL is correct and that the Basic Auth details are correct if you’re using them.
Advanced testing
If you want to capture the contents of a webhook to examine them, the easiest way is use a service like RequestBin which will capture the result and let you view it in a browser. RequestBin allows you to create a URL that will collect any requests made to it. You can then inspect your requests and see the values returned. The URL provided is temporary and can only be used for 20 requests or for 48 hours (whichever comes first).
Linking Thermometers
Before clicking on the Linked Thermometers tab, ensure you’ve test fired your webhook and you receive a 200 status.
Until this is complete, you will not be able to link Thermometers to the endpoint.
When you’re ready, click on the Linked Thermometers tab. It will look something like this:
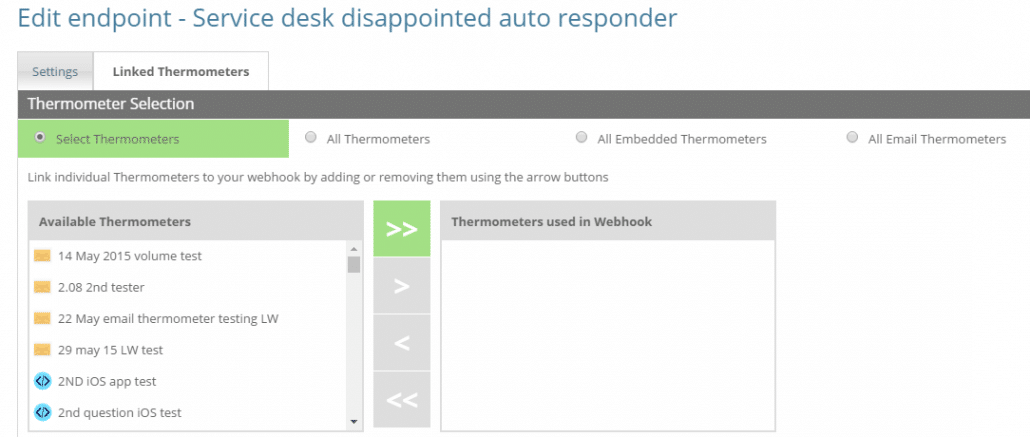
The interface is intuitive. Simply scroll down to the the Thermometer or Thermometers you’d like to associate with this endpoint and click the chevron to transfer it to the box on the right:

Note you can include as many as you wish.
In some scenarios, only one Thermometer might be included. In others, there might be several. Flexibility is everything!
You can use the Selection radio buttons at the top and also remove Thermometers from the ‘included’ box, but selecting them and clicking the chevron to send it back the other way.
When you’re happy with your selection, click the “Save webhook” button.
